Back to InventoryDirect Main Menu
Below are some common questions we receive about InventoryDirect. Click on the questions for more information, troubleshooting instructions, and best practices.
Inventory FAQs
InventoryDirect was designed to track the costs and quantity of your consumable items like Toilet Paper, Bleach, Copy Paper, Rubber Gloves, etc. There are 7 different Catalogs used to group and track these items: Custodial, Mechanical, Tools, Other, Technology, Instructional, and Food Services. Tracking these items assists you in quantifying on hand supply, monitoring usage trends, and reducing shrinkage.
We do have a feature in the system for tracking Tools, such as floor buffers, power washers, cordless drills, etc. Each Tool is entered into the system individually with a maximum quantity of 1 and then checked out by a user and cannot be issued out again until checked back in.
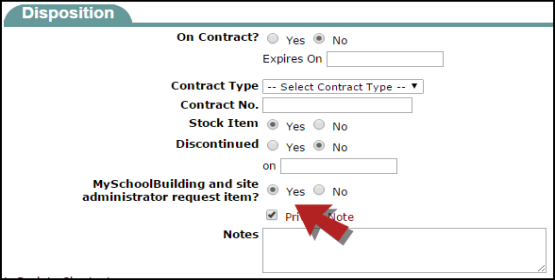
When adding inventory items to InventoryDirect you have the ability to determine whether or not items are available to your Requesters and Site Administrators. In the Disposition section of the Add/Update Inventory screen, select Yes next to MySchoolBuilding and site administrator request item? It’s important to note that by default ALL items are marked as not available to Requesters and Site Administrators.

Any transaction in InventoryDirect can be deleted with the exception of Adjustment transactions. Adjustment transactions that have been improperly entered can be corrected by creating another adjustment.
The Ship To and Bill To addresses appear on the Supplier Detail Form that you can print out to Reorder your inventory. You can get to this form by following the steps below:
- On your home page, click on the Reorder link which is located on the right hand side under Inventory Reorder.
- In the Shortcuts section, click on the link for Print My Previous Orders.
- Fill out the form to narrow down the Inventory you would like to print Reorder forms for in Steps 1 – 13.
- In Step 14 choose Detail Form and make to select Supplier from the drop down list.
- In Step 15 choose PDF.
- In Step 16 click Print This!
User & Email FAQs
InventoryDirect has a unique process for Requesters separate from our other products. Most school systems that we work with only want a few people at each of their sites to be able to make inventory requests. Therefore Requesters cannot add themselves to InventoryDirect by submitting a request. An Administrator must add the Requester to the system and assign them to a Location before they will be able to submit a request. Because of this we have designed InventoryDirect so that only Requesters assigned to a Location will be able to submit requests. To assign a Requester to a Location follow these steps:
- If they are not in your InventoryDirect User List, add them as a Requester. If you have other products to which they have access you can pull their name over from our Registered Users list.
- In the Shortcuts menu, click on Assigned Locations.
- Check the boxes next to the Locations for which you would like to allow them to submit requests.
- Click Next Step.
- They will now be able to go to MySchoolBuilding and submit requests for their assigned Locations.
Yes, click here to view the email addresses and IP ranges that need to be allowed.
InventoryDirect offers the following email notification options.
- Email requester receipt notification - This option emails the Requester to confirm their request for item(s) has been received.
- Email requester status and routing changes - This option emails the Requester when their request changes status as well as when their requests have been approved and/or issued.
- Email IND/Site Admin/Clerk for request needing his/her approval - This option will email any user involved in automatic routing when a request is sent to the user for approval.
- Email IND Admin when inventory goes below the designated level - This option will email the administrators of the account when an inventory item's quantity on hand goes below the set low amount for the item.
*Note: InventoryDirect Email notifications will go out twice a day on 12:00 PM EST and 7:00 PM EST.
Reporting FAQs
InventoryDirect has the ability to run many reports. To get a great snapshot of your Inventory follow the steps below.
- Log into your InventoryDirect account.
- Click on your Inventory tab at the top of the page.
- In the Shortcuts menu, click Print My Inventory.
- Narrow down the information you would like to see in Steps 1 – 13. If you want to see all data you can leave as is.
- In Step 14 you can choose whether you would like a Summary Report or Detail Report. Both will give you the information that you are looking for – Item number, Description, Cost, On Hand Quantity.
- You can print to PDF or Excel.
- Click Print This.
Printing labels is an easy task in InventoryDirect! To do this:
- Go to the Inventory tab and then click on Print My Inventory from the shortcuts section at the top of the page.
- Here you can use any of the filters to narrow down the list of items you wish to print labels for (specific types of items, items in a particular pool, from a specific supplier, etc.).
- In Step 14, select Bar Code Labels and then choose the appropriate label size from the drop down list.
- Click Print This in Step 17 icon. This loads a print preview window on your screen that you can then send to the printer.
For additional information on using barcodes, click here.
Performance Issues
We recommend following our troubleshooting guidelines if you are experiencing slow performance.
